How to transfer files from Android to iPhone
If you’re moving from an Android device to an Apple iPhone, you’re probably wondering how best to transfer files from Android to iPhone so you can keep your apps, documents, etc. Fortunately, you can do this in a number of different ways and we will help you with this complete guide.
First, let’s present the official way to carry out the procedure as indicated by Apple’s own instructions. But if that doesn’t work, check out other ways to transfer files from Android to iPhone at the end of this guide.
Preparations
Before doing this, it is recommended that you back up your files on the Android device to avoid, just in case the procedure goes wrong, losing any data. Now, the next step will be to download Apple’s official app on your Android smartphone, the “Move to iOS” app, available on Google Play through this link.
It is further recommended that you make sure both devices are connected to the charger and on a secure and stable Wi-Fi network. Therefore, avoid doing this on public or unstable networks, as it could end up corrupting the data or disrupting the transfer before it’s completed.
Finally, also make sure that your iPhone does have enough storage space to hold all the files and documents that will be transferred. Also consider what’s included on your Android microSD card, if you have one.
This procedure works only for iPhone devices that are undergoing first-time setup. That is, this method is suitable for new iPhones or for those who have just reset the device to factory defaults.
Transfer files from the Android to iPhone with the official app
Attention! Before starting the procedure, you will need to turn off mobile data on the devices, but keep Wi-Fi connected. This is necessary for the Apple app to be able to create a secure and private network so that it can then transfer files from Android to iPhone. Also, this can only be done on devices running at least Android 4.0 and iOS 9 or higher.

Step 1: The next step will be to open the app on your Android device. You will see a screen titled Move to iOS, explaining how the app works. Here, just tap “Continue”.
Step 2: Start configuring your iPhone until you reach the Applications & Data screen. Here, you will see several options, including one called “Migrate Android Data”, tap this.
Step 3: Now tap “continue” on the screen titled Move from Android and then you will receive a six-digit code. Take note of this code and go to the next step.
Step 4: Back on the Android device, tap the Find Code button in the upper right corner of the screen and then you should enter the code received from the app as explained in step 3. Then just wait until the “Transfer Data” screen appears .
Step 5: On the data transfer screen, you can choose what sort of date you want to send to your iPhone, such as:
- Contacts;
- Message history;
- Photos and videos;
- Web favorites;
- Calendars and e-mail accounts;
- Free apps available in both Google Play and App Store;
Select everything you want to transfer and simply tap “Next”. Wait for the entire process to complete and try not to touch any of the devices until it completes. That’s it, just click “done” on the iPhone and now you know how to transfer files from Android to iPhone!
Transfer files from Android to iPhone with Google Drive
If the above step-by-step doesn’t work for you, or if your iPhone isn’t a new or factory-restored iPhone, be aware that you can still transfer your files, even if just partially. With this method it is important to mention that you will not be able to transfer applications; only images, contacts and documents stored on your Android or your micro SD card.
Again, it’s still important to make sure the sheer size of the data you are transferring fits into your iPhone’s storage space. After all, Apple devices don’t offer the ability to include a micro SD and this could mean you have a lot more storage on your Android device.
With everything double checked, the next step will be to download Google Drive on both devices. You can do this by accessing the app’s links for Android or iOS.
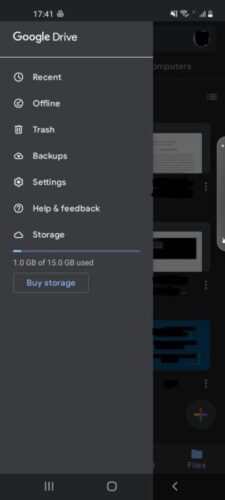
Step 1: With Google Drive installed on your Android device, open the app and then tap the menu with three horizontal lines at the top left of the screen.
Step 2: Then tap Backups as shown in the image below.

Step 3: On the next screen, set your backup and tap to make it so your files will be stored in Google Drive. Wait for the backup to finish, or if nothing happens, go through your Android device settings to back up your data on your Google account.
Step 4: With the backup done, open Google Drive on your iOS device and then log into the same account you used to store the files on Android. With that, your documents will all be in the cloud and now you can transfer files from Android to iPhone.
The best way to make this transfer after the backup is using the official Apple application called Files, as you can follow in the official guide of the company itself.
Transfer files from Android to iPhone with a computer
If you have a computer, another simple way to do this procedure is to connect your Android device to your PC, notebook or MacBook via a USB cable and then transfer the files such as music, photos, and pictures to a folder on your computer. After doing this, you will be able to organize everything directly through the iTunes PC application (which in this case would only work for photos, music and videos), it can be downloaded here.
If you choose to do this through iTunes, then just sync it back to your iPhone device and your music and videos will be available through the app. Alternatively, you can simply connect your iPhone to your computer and transfer directly.
Applications to transfer files from Android to iPhone
In addition to these methods, you may choose to use dedicated apps to do this. However, it is important to mention that these apps may not be as secure as the options above, which protect your privacy and help prevent documents from being stolen. Therefore, we are going to present only the three safest options for you:
1. SHAREit

Among these options, SHAREit is the most secure as it does not depend on any type of internet connection to transfer files from Android to iPhone. It’s free and it’s intuitive, allowing the transfer of videos, photos, audios, contacts and other data to be done easily. You can download it for free on Android and iPhone to get started.
2. Feem
Feem is a company that also focuses on security. The way the app works is that it creates a private network for the transfer to take place. It can be downloaded on your Android, iPhone, Windows Phone, Mac, Windows computer or even Linux. This way, you will be able to transfer your files from any device to the other without any difficulty. Access their official website and you will be able to download it according to whatever platform you are looking to have it on.
3. Instashare
As a third option, Instashare is also a safe choice, and can be used to transfer files from Android to iPhone and vice versa. It can also be installed on Mac or Windows, whatever you have at your disposition. It has a short video explaining how to use it directly on the official page. It’s very intuitive and the transfers go down quick and smoothly with the app, so just go to the website and follow the procedure shown in the video.
Were able to transfer files from Android to iPhone?
So, were you able to successfully transfer your files using this guide? Changing phones can be a nightmare, but fortunately there are easy to digest guides like this on the internet! Tell us about your experience down below, leave us a comment! And if you are looking for more on the iPhone, check out this list with the 20 best designer apps available on the platform!


