How to fix Windows Updates that keep failing!
Windows Update update failures can appear in many different ways and at various points in the update process. From low disk space to driver conflicts, it can take hours to determine what went wrong. To make it all a bit easier for you, we have selected a few of the easiest ways to fix Windows Updates that keep failing.
If you want to learn more about how you can do so, just check out our tips down below!
Causes why Windows Update failed
To fix any Windows Update update failures and successfully update the operating system, try each of the following fixes in order. You don’t need to try them all. If you can successfully perform the updates after trying a fix, you can safely ignore the rest and go back to using your newly updated computer.
- Multiple updates queued: One of the most common causes of this failure is when Windows needs more than one update. When this happens, simply rebooting and trying again will result in a successful update. You can also solve other unpredictable and minor problems with the same fix;
- Out of hard drive space: If your computer does not have enough free space on the drive to complete an update from Windows Update, the update will stop and Windows will report a failed update. Clearing some space will usually solve the problem;
- Corrupted update files: Deleting invalid update files usually fixes the problem. It may be necessary to boot into Safe Mode to clean the files, but it is a good way to fix Windows Updates that keep failing;
- Hardware conflicts: You may have a device connected that is interrupting the update process. If you disconnect all unnecessary peripherals, the update can be completed;
- Driver Conflicts: This is a similar issue with an identical solution. Disconnect all your peripherals, such as printers and USB hubs, and try updating again.
1. Run the Windows Update Troubleshooting Tool
The first thing you need to do is run the Windows Update Troubleshooter. This tool comes with every copy of Windows and tries to find issues related to Windows Update. Likewise, it can also repair corrupted files and processes to try to fix Windows Updates that keep failing.
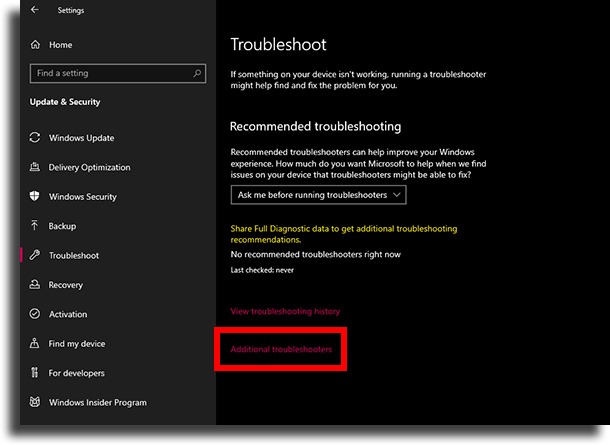
- 1. Press “Windows + I” or select Start > Settings > Update & Security > Troubleshoot > Additional troubleshooters;

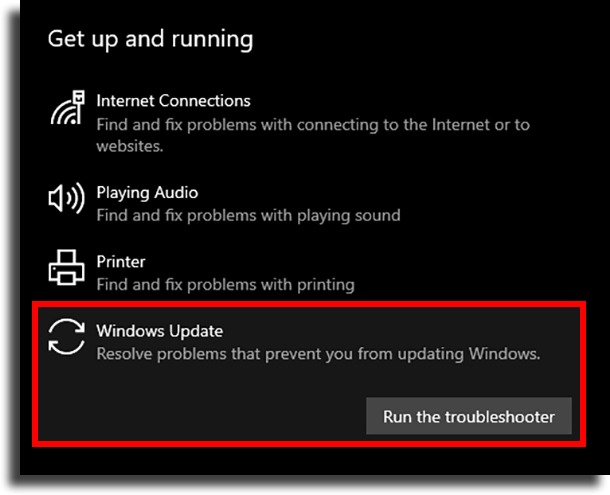
- 2. Next up, under Get up and running, hit Windows Update, and then Run the Troubleshooter.

Now, just wait until the troubleshooter is done finding the problems and applying the suggested fixes. If you have tried all the suggested solutions, you can skip this step and go to the next step. After the troubleshooter has done its job, go to the next step.
2. Run DISM (Deployment Image Management and Maintenance)
The next thing you need to do is check and fix corrupted system components. Corrupted system components are one of the main reasons that updates fail, so it’s best to find and fix them before trying to update again.
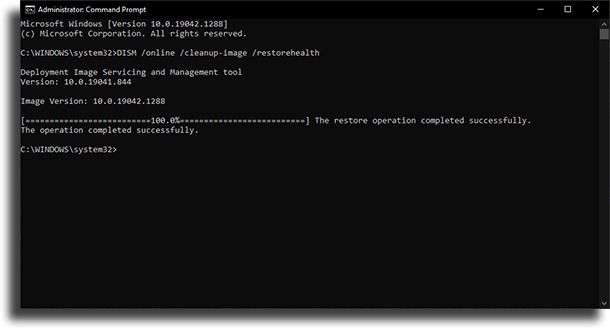
- 1. To start the process, open a Command Prompt window by typing cmd into the Windows search bar, right-click and select Run as administrator.
- 2. In the Command Prompt window, type DISM /online /cleanup-image /restorehealth and press Enter. When you press Enter, DISM will start checking the Windows Component Store files for damage and will attempt to fix the corrupted components.

Important: When you run this command, DISM uses Windows Update to provide the files it needs to fix the corruptions. However, if the Windows Update client is already damaged, use a running Windows installation as the repair source or use the Windows folder from a network share or removable media such as the Windows DVD, as the source of the files. To do this, run the following command:
DISM.exe /Online /Cleanup-Image /RestoreHealth /Source:C:\RepairSource\Windows /LimitAccess
Note: Replace the C:\RepairSource\Windows placeholder with the repair source location.
Performing a DISM check before moving on to the System File Checker (SFC) check is important because SFC relies on the Windows Component Store of the Windows image you are running. If the component store is corrupted, SFC will not work.
Therefore, run DISM to ensure that when you need to run SFC, you can do it without any problems.
Once DISM has finished running, you can move on.
3. Run a check on SFC
Where DISM checks and fixes system components, SFC (System File Checker) checks Windows system files that are corrupted and attempts to fix them by replacing them with stable versions from the Windows component store. It can easily fix Windows Updates that keep failing.
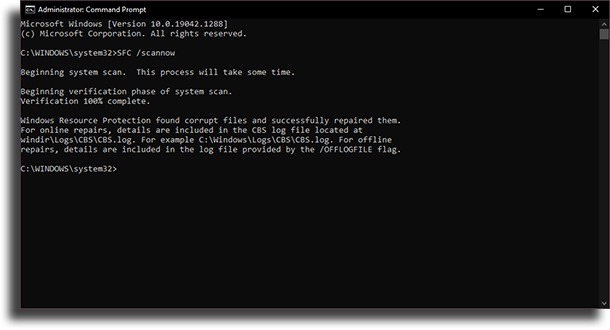
The execution process of SFC is almost the same as DISM. As before, open a Command Prompt window with administrative privileges. Then type SFC /scannow and press Enter.

The sfc /scannow command will scan all protected system files, replacing corrupt files with a cached copy that is located in a zipped folder in %WinDir%\System32\dllcache.
The %WinDir% placeholder represents the Windows operating system folder. For example, C:\Windows.
Note: Do not close this Command Prompt window until the verification is 100% complete. The scan results will be shown after this process is complete.
Let SFC do its work and when it’s done, restart the PC.
4. Pause Windows Update updates
After finding and fixing any component and file errors, the next thing to do is delete the old update files.
Windows updates are a mess, which is why most people aren’t updating to the latest versions of Windows. One of the reasons they are such a mess is that different updates can create conflicts that lead to failed updates.
A simple solution to resolve these conflicts is to delete the updates that have already been downloaded and run the process again.
One way to delete downloaded updates is to pause and resume updates. Windows will delete downloaded update files if you pause automatic updates, which can fix the ones that keep failing.
- 1. To do this, press “Windows + I” to open Settings and go to Update & Security > Windows Update > Advanced Options;
- 2. Under Pause updates, in the Advanced options, select a date when you want the updates to resume. For example, select a date for the next day;
- 3. After selecting the date, restart your PC. Windows will resume updates after one day and erase all downloaded updates.

Once updates are resumed, you can download the files again and try again.
5. Delete old data from Windows updates
While the “Pause / Un-Pause” method works well for deleting previously downloaded updates, it is not a foolproof way to delete old update files. The best way to do this is to delete the SoftwareDistribution folder.
The SoftwareDistribution folder contains cached updates. Windows Update Service uses this directory to distribute software, hence the name. Therefore, to delete this folder, you need to disable background services first.
Although you can manually disable background services, a faster and safer way to do this is to boot into safe mode. Therefore, follow these instructions to boot into safe mode.
When Windows Safe Mode starts up, open File Explorer and type SoftwareDistribution in the search bar in the upper-right corner. Once the folder appears, delete it.
After this process, restart the PC and try to update through Windows Update.
6. Resolve driver conflicts
Windows updates can also fail due to driver conflicts. Therefore, you should clear up these conflicts after a failed upgrade.
You can resolve most driver conflicts by updating drivers to the latest version. If the update doesn’t work, you can also try deleting and reinstalling the different versions.
Eliminating these driver conflicts helps a lot to ensure you have a smooth update experience the next time you run Windows Update.
7. Manually roll back Windows Update updates
In the event that Windows Updates keep failing, the component-based service (CBS) tries to roll back the update to fix it. While it works well, for the most part, this reversal can fail.
If the rollback fails and you can boot into the operating system, you can uninstall the update from within the Settings panel.
On the other hand, if the update fails and you are unable to boot into the operating system, you will need to boot into Windows Recovery Environment.
In the first case where you can boot into Windows, press “Windows + I” or navigate to Settings > Updates & Security and choose Recovery in the left pane.
Then, in the “Restore Your PC” section, click Start Now and follow the instructions to revert the changes.
If you are unable to boot into Windows after a failed update, boot into Windows Recovery Environment. To do this, when you turn on your computer and see the first screen, press F11 (Note: some systems may require you to press a different key, such as F9 or F12).
Then navigate to Troubleshooting > Advanced Options > Uninstall Updates > Uninstall Latest Feature Update.
After uninstalling feature updates, try booting into Windows. If you are able to boot successfully, run Windows Update again.
However, if you still cannot boot, the only option left is to manually install a fresh copy of Windows from bootable media.
Windows updates fail, but you can always try again!
There are a multitude of things that can go wrong when Windows tries to update. Therefore, the fear of something breaking can prevent you from updating regularly.
Fortunately, you can undo almost anything that Windows Update changes. From clearing cached files to rolling back updates manually, preparing Windows for another update attempt isn’t difficult.
In short, you don’t have to worry about problems that can arise with updates from Windows Update, because you can always fix them. So just go ahead.
And don’t forget to also check out how to turn on Dark Mode on Windows 10, as well as how to disable Chrome automatic updates!


