Learn how to enable privacy features on Facebook
Privacy is one of the most important and feared things when we think about social networks, so today we’re going to explain how to enable privacy features on Facebook to protect your information.
A survey carried out this year by NordVPN, a provider/service provider of Virtual Private Network or Virtual Private Network, on the use of social networks in the world found that people spend upwards of 90 hours a week on apps.
So it’s about time to stay safe, isn’t it?
Online course groups, mentorships, and others of interest to us exist in droves on Facebook and you can’t stop using the network due to insecurity with your data.
A few simple steps will help you enjoy all the benefits of online life, but with some necessary security measures. After all, not everyone wants their content shared, so let’s show you how to enable privacy features on Facebook.
There are two options for making these changes: by computer or by cell phone.
See below.
Learn how to enable privacy features on Facebook on your computer
To activate privacy settings via computer, you will need to be on the Facebook page and logged into your account.
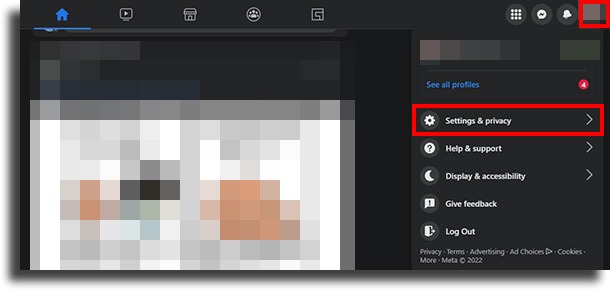
- On your profile page, click on your profile picture in the top right corner of Facebook.
- Select “Settings & Privacy” and choose “Settings”.
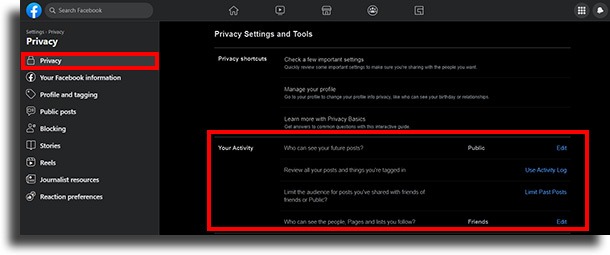
- Go to the “Privacy” option. Then, choose who you share your content with and who can respond to it.

Enabling security for your posts
Besides enabling privacy features on Facebook, you can also manage who can see your posts when sharing content. For this you must:
- At the top of the Feed or profile, click “What’s on your mind?”
- Click the audience who will be able to see your content (for example, Friends, Public, or Only Me). If you’re on mobile, this space will be above your name.

Managing your information
Besides enabling privacy features on Facebook and who can see your posts, there are other ways to review and manage your information on Facebook:
- Review Facebook’s Privacy Policies and manage your privacy settings in the Privacy Center. In this link, you put two-factor authentication, where in addition to the password it also requests a login code. Limits who can see your posts and can report bullying.
- Update Feed Preferences to see more content you’re interested in. To do this:
- Click on your profile picture in the top right corner of Facebook.
- Select Settings & Privacy and click Feed.

- Click on any of the following options to adjust your Feed preferences:
- “Favorites” here you select the people and Pages you want to prioritize. This means their posts will show up at the top of the Feed, and you’ll see those most recent posts first;
- “Snooze” to take a break from any page or person you don’t want to see posts for a while;
- “Unfollow” to unfollow a person, Page, or group;
- “Reconnect” to re-follow a person, Page, or group that you previously unfollowed;

Ad preferences
You can also modify “Ad Preferences” to see ads that are more relevant to you. There, you can update your ad settings to control various options, such as whether to show ads based on your use of apps and websites outside of Facebook, for example.
You can also hide an ad that is not interesting or useful to you or analyze why you are seeing a specific ad.
- You can check the “Privacy Check” tab to make sure you are sharing information with whom you want to.

- Below you will see all the options that can be managed by you within your page: who can see your posts, who can find you on the network, and which ads are shown to you and others.

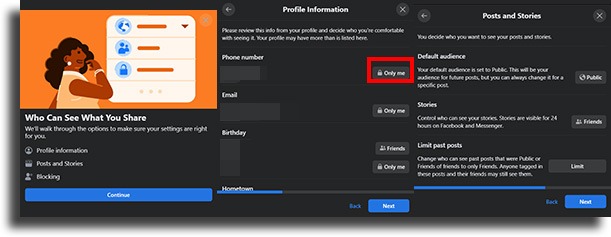
- In “Who can see what you share” the options to share your profile information such as your birthday data – which you can activate or deactivate) email, phone linked to Facebook, work data, hometown, and your friends list. Just select which of the boxes above you’re going to start with and, in each option, click on the interactive buttons for each item and adjust the settings as you like.
You can leave it open to the “public“, and select “friends” and only those who are your friends on the network will be able to see this information. You can also opt for “friends except for acquaintances” if you have edited your friend list and selected some as “acquaintances“. There are still other options such as: “only me“, “personalized“, “close friends” and “acquaintances“, but it is worth remembering that these names of friends and acquaintances need to be mediated by you on the network, ok?
Learn how to enable privacy features on Facebook on Android and IOS smartphone
The application has some slightly different paths, but in the end, we will arrive at the same options that we reported above.
So we separate a step-by-step to make it easier for you to find the information.
To view and adjust Feed preferences
- In the top right corner of Facebook, click on “Settings” (as we explained above)
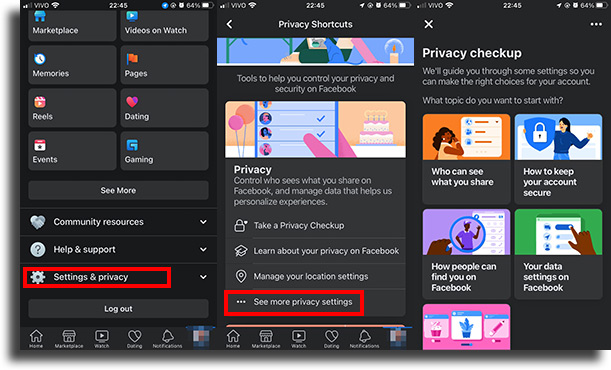
- Go to “Settings and Privacy” at the bottom of your screen and then select “Privacy Shortcuts”.
- On the privacy shortcuts screen, click on the three dots at the bottom of the “See more privacy settings” screen
- Now select “Check some important information” and you can enter each of the options to define the degree of privacy both for who can see what you share, as well as your preferences for advertisements, etc. In the same way that we explained in the topic above for access through the computer.

That’s it, now you have your feed set up and ready to see only what you want and share information with only those you want.
Now you know how to enable privacy features on Facebook
To learn more tips like these, keep following our blog and share them with friends.
Take the opportunity to also see:
- Carousel, Image or Video: Which Format Has the Most Engagement on Instagram?
- The best spy apps for Android and iOS: Top 25!
- How does Facebook Gaming work? [2022]


