How to get verified on Instagram in 2023?
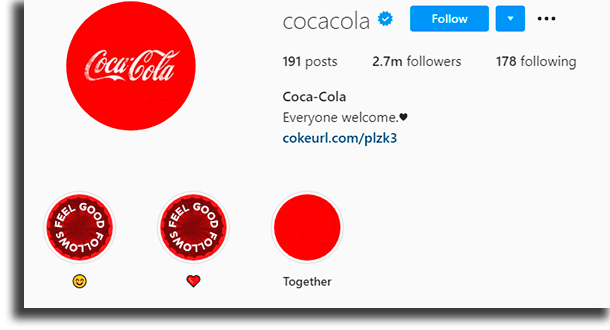
You might have already noticed that many profiles on Instagram have that blue tick at the side of their names. This is meant to verify official profiles, whether they belong to celebrities, public figures, or large companies in the social media platform, and for a while now anyone can get verified on Instagram directly on the app.
If you want to get verified as well to get some more credibility for your account, check out down below what are the requirements and what you need to do to get verified!
Why should you get verified on Instagram?
Getting verified (i.e., getting the blue tick) indicates that the account has been officially recognized by Instagram. That means the profile is the official profile for the person, brand, or public figure, which helps to let your followers differentiate you from profiles that pretend to be you, usually for scams. This also helps in the reporting of them
Fake profiles are a huge problem since ill-intentioned users can get followers by utilizing other people’s fame and posting articles, images, and whatever else for personal gain, something that’s expressly forbidden on Instagram’s ToS.

Who can be verified?
Instagram asks that you follow a short requirements list before being able to get verified on the platform. They are:
- Authentic: Your account must represent a person, entity, or company that’s registered and real;
- Unique: Your account must be the only one on the platform to represent that person or that company. Instagram reaffirms that only one account per person or per company can get verified, with the exception of cases for accounts for different languages and regions;
- Complete: Your account has to be set as public and must have a filled-out biography, a profile picture, and at least a post made. Other than that, the profile can’t have any links asking to be added or followed on other social media platforms;
- Notable: Your account must represent a person, brand, or entity that’s well-known and much searched for.
Instagram also warns that if users send requests to get verified with fake or incorrect information, the platform can not only remove the blue tick from the account but also take additional action to delete the account from the platform. So, unless you meet the requirements above, it’s better not even to try to do it.
How to create a bio that meets the requirements for the blue tick
Try to use a profile picture that shows either the logo of your company or yourself before sending the request. Additionally, fill out a full biography with a description of your work, product, or service. To have some ideas, check out our best Instagram bio ideas.
On your profile, also fill out the information about your location, and contact phone, and have a verified e-mail on the social network. Instagram might not explicitly require it, but having a verified email does help out when trying to verify that your account is authentic, and it also makes you look a bit more trustworthy to your followers.
How to send a request to get verified on Instagram
The steps you need to take to request a blue tick for your account are quite simple, and are listed below:
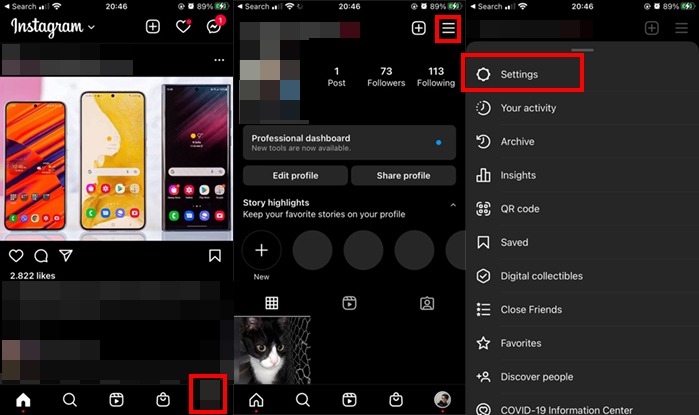
Step 1: Open your profile and press on the icon for your profile, then on the three dashes in the top-right corner, and finally on Settings at the top of the screen, as the image shows;

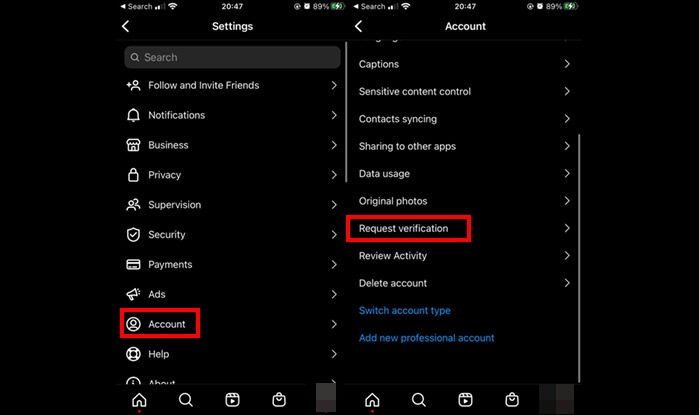
Step 2: Click on the Account button and then, after that, click on the Request Verification, near the bottom of the screen.

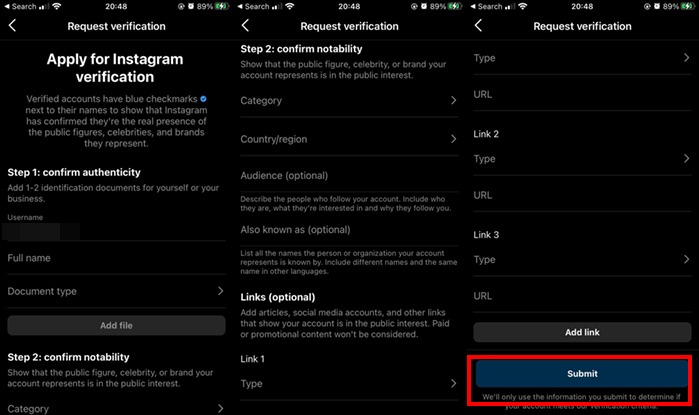
Step 3: In the new screen, Instagram will tell you what exactly the verification is all about and what you need to do to request it. Then, you’ll fill out your full name and a photo of your ID, choose the category and country/region for your account, choose your audience and your aliases, and add links, if you want.

After filling out these fields and selecting your ID, just hit the Submit button and you’re all set for your requisition to be processed by the platform. It is worth reminding you that this does not guarantee that your account will get the blue tick for verified on Instagram.
According to Instagram’s support, the users will receive a notification to inform them whether they were approved or denied on the verification request. If you got denied, you can then request again after a period of 30 days has passed.
Tips for taking good pics of your ID
Avoid having your request to get verified on Instagram denied due to the low quality of your ID images. Ideally, try to scan them since scanners will always output the best quality and ensure that all the fields are perfectly legible. If you don’t have a scanner available, you can take a photo of your ID.
To do so, make sure there’s enough even lighting over the entire document, avoiding any shadows. Other than that, check your camera’s focus, so that all the letters and lines in the documents are legible. You can also enable the grid lines on your native camera app to take even better shots.
If you have any issues when trying to take good photos, you can also try to use TinyScanner, an app that will basically turn your smartphone’s camera into a decent-quality scanner!
Did you like our guide on how to get verified on Instagram?
Share this article with friends who also want to get verified, and don’t forget to also check out the most popular Instagram hashtags, learn what to do if you think Instagram is down, and learn how to save a live video on Instagram!
If you want to become more popular on social media platforms, using one of the best apps to get Instagram followers, such as Stim Social, might be a great bet.
Stim Social lets you schedule your posts on Instagram and on TikTok, to be able to always post relevant content at the best possible times and get the most engagement out of it.
It also offers you analytics, insights, and reports about your profile on Instagram (and on TikTok) so that you can better keep track of the growth of your profile on these platforms. To learn more about Stim Social and start using it, follow this link to the official website and enjoy its 5-day FREE TRIAL!


