Figma: Free online UI design tool
If you’re looking for an alternative to design platforms or want to evolve your creations, we’ll show you how to get started using Figma, this amazing, free, online UI design tool.
Figma is an online vector graphics editor with an emphasis on prototyping graphical interfaces and user experience design frameworks.
Simply put, we can say that with Figma you will be able to create your illustrations completely, through vectors, as in Photoshop, but without the need to install software on your computer.

In addition, it has robust features that support teams working at all stages of the design process, and this is its great differential: collaborative work and in real-time!
All of this allows a team of different professionals in different locations to view and work on changes to a project in real-time. Possibilities that competitors like Adobe XD and Sketch doesn’t offer.
And if you’re a designer, get to know a few apps to make a designer’s job easier.
But, do you know what UI design really is?
User Interface Design is the means by which a person interacts with and controls a device, software, or application. This control can be done through buttons, menus, and any element that provides an interaction between the device and the user.
Therefore, the possibility of prototyping Figma makes it a powerful tool. Interested and want to know where to start?
So let’s explore the Figma universe together, starting with your registration, then the first steps to creating a design, let’s talk about how to create prototypes and a little about plug-ins. Finally, we will bring the available plans and values.
1. How to use Figma?
Figma’s interface is very intuitive, but initially, some features may seem a little difficult to understand. However, it has the same functions as its competitors, so if you already know it, or if you dedicate yourself to learning one, you will easily understand the others.
2. Register
To get started you need to register on the Figma web platform. For this, use this link.
When registering, there is a window to define which plan you will choose, as shown in the image below:

With the plan chosen, you can start with a standard design or, if you prefer, you can use another feature of the platform called FigJam, and we will talk about it later.
If you want to work as a team, you must create a team, click on the menu on the left on “Create a new team” and enter the emails to invite the members. You will determine the level of permission each person will have when accessing the designs: view, comment, edit.
Each file can receive collaboration from up to 500 people, with a limit of 100 members with editing permissions.
In the team area, you will have access to an exclusive library, with all the team’s projects and other options such as color palettes, logos, and graphic elements, which are part of the standardization of the work.
And that makes the development of team tasks much easier.
3. Creating a design
To start a design, click on “New project file”, Figma suggests some template options based on iPhone or Android devices, for example, and even desktops, however, there is the option to start a blank design or start with a template for Instagram or Facebook.
Once your initial design is opened, you will have access to the menu that is divided into three main areas:
- The Toolbar top left menu where you will find files, grids, shapes, brushes, texts, hand tools, and comments.
- Layers and Pages, on the left side menu, to access the hierarchy in creating objects.
- Properties bar right side menu, where information about dimensions, sizes, design options, etc.

Before starting your design, it is worth mentioning that each Figma file is like a big board where you can include several pages.
It is possible to insert all designs, even with different sizes and formats. Unlike other design apps where you can only insert files with the same pixel size.
Now let’s get down to business, start naming your file to work with your projects or clients, so that all work related to a client can stay inside that file.

In the layers bar, you will have the option “Layers”. Once selected, it will allow you to move the creations back and forth, alternating the layers
s. There is also the “Assets” option where you can insert and create your components.
In Figma, it is possible to standardize components, icons, etc., in this way everything you save as a component will be available for use in this tab.
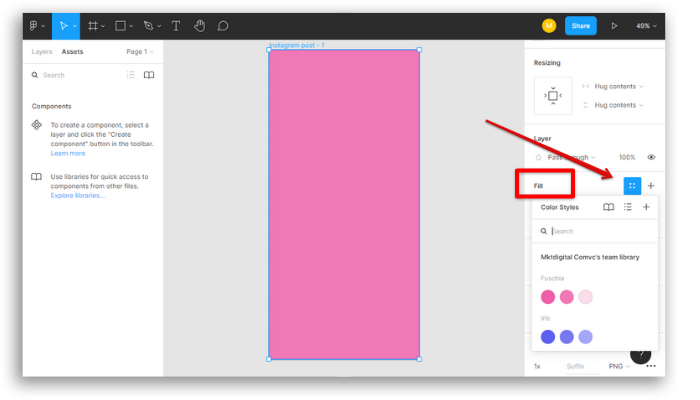
It is in the toolbar that you will have options to help you create your design items: drawings, insertion of texts, etc. Create an object and clicking on it will make the property bar options available for changing fill colors, effects, styles, and more.
Another wonderful function, which can help you save a lot of time, is in the “Text” or “Color” section. There, by clicking on the four dots, you can save your style in a personalized way. So, when you need it, just click on the 4 dots and apply.
All changes to the template are automatically saved in the cloud, and its editing panel even has a presentation button so you can follow how your art is doing on different devices.
Another amazing resource is the tutorials that help you understand the entire operation of the tool step-by-step. Access this link and unlock the tool.
4. Prototypes
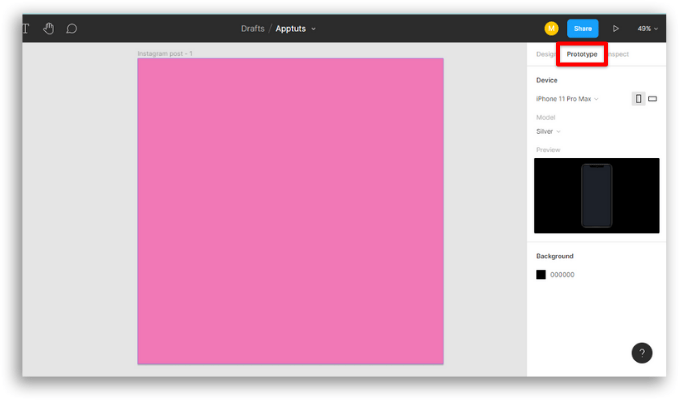
Now let’s talk about this amazing option of Figma which is prototyping, an excellent UI design tool.
To start a prototype, go to the top-right menu, in the properties bar, and click on “Prototype”.
The learning curve is very fast and easy to approach, as well as enabling a large number of functions such as entry and exit animations, overlays, long-touch interactions, smart animations with adjustable durations, and others.
And the most interesting thing is that you only need a link to present your prototype. And if you have the Figma Mirror app installed on your smartphone or tablet, you can easily present your prototype to your mobile device.
5. Plugins
Essential in UI designer interfaces, Figma has interesting plugin options, to download for free, such as Unsplash, Autoflow, Iconify, Fig Moji, Mapsicle, Graphics.
6. FigJam
This collaborative framework suggested for brainstorming and concentration of ideas is another one of Figma’s very interesting tools.
It has the very attractive collaborative features of the tool, with the freedom to customize your boards.

7. Values and plans
As it is a web-based app, you can use Figma on any operating system and its Figma Mirror app is available for iOS and Android.
As we said from the beginning, Figma is a free tool, but there are two other plan options: the professional program and the program aimed at organizations and companies.
Finally, let’s point out that Sketch, Figma, and Adobe XD are the top three UI design tools and all three are great, each with its pros and cons.
And Figma brings big and powerful companies in its portfolio, such as Airbnb, Dropbox, Repsol, News UK, Zoom, GitHub, Microsoft, Notion, and the University of London.
Did you like to know Figma as a UI design tool?
Tell us if you want to know more about the particularities of this amazing web application.
If you are interested in using design to properly improve engagement, these links below might be useful to you:
- How to use Google Workspace for digital marketing
- The 9 best ways to use Google Workspace for Web development
- 6 tips to gain followers and raise engagement on Instagram
- How to run successful Instagram giveaways: 10 essential apps!