How to screenshot in different formats on Mac!
When you press Cmd+Shift+3 or 4 to take a screenshot on your Mac, the file is automatically saved in PNG format, but it is possible to change this pattern and have your screenshots saved in other formats, such as JPG, GIF, TIFF, HEIC or even PDF.
If you don’t want to be using conversion tools to change the format after taking the screenshot, check out this article for the guide on how to screenshot in different formats!
Read also: MacOS recovery mode: 8 ways you can use it!
Changing the format permanently using Terminal
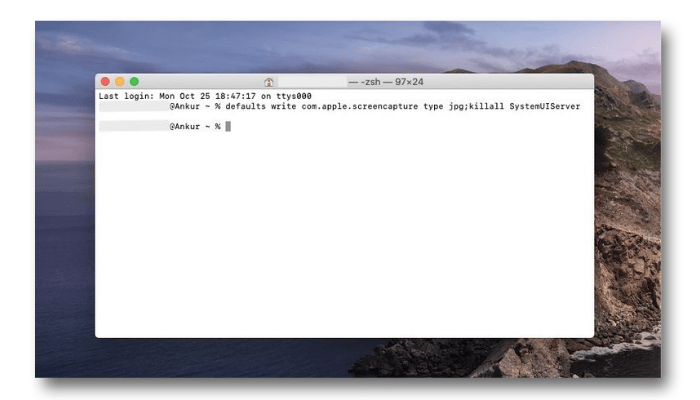
Terminal is very useful for many functionalities on Mac, saving your screenshot in different formats is just one of them! It’s important to note that this setup will apply to all screenshots you take from the change onwards, but you can revert it all back to PNG again.
Check out the steps to change the format of your screenshots using Terminal:
- Open Applications > Terminal > Utilities or search it on Spotlight.
- Choose one of the commands below. Copy and paste it on Terminal and then press Enter.
- To save the screen shot on JPG:
defaults write com.apple.screencapture type jpg;killall SystemUIServer
- To save the screen shot on HEIC:
defaults write com.apple.screencapture type heic;killall SystemUIServer
- To save the screen shot on PDF:
defaults write com.apple.screencapture type PDF;killall SystemUIServer
- To save the screen shot on GIF:
defaults write com.apple.screencapture type gif;killall SystemUIServer
- To save the screen shot on TIFF:
defaults write com.apple.screencapture type tiff;killall SystemUIServer
- To save the screen shot on PNG:
defaults write com.apple.screencapture type png;killall SystemUIServer

As you can see, the command follows the same pattern to change all formats, so all you’re doing is replacing png with jpg , heic , pdf , gif or tiff .
To test it out, press Cmd + Shift + 3 to take a screenshot, then select the saved file and press Cmd + I to check its information.
Under Image Type you will see the new format that has been set.
Changing the format permanently using Onyx for Mac
Onyx for Mac is a program from Titanium and a good option for those who want to save their screenshot in different formats.
One of the advantages of this software is the fact that it has versions available for all versions of macOS, which means that you can download it even if your operating system is a little older.
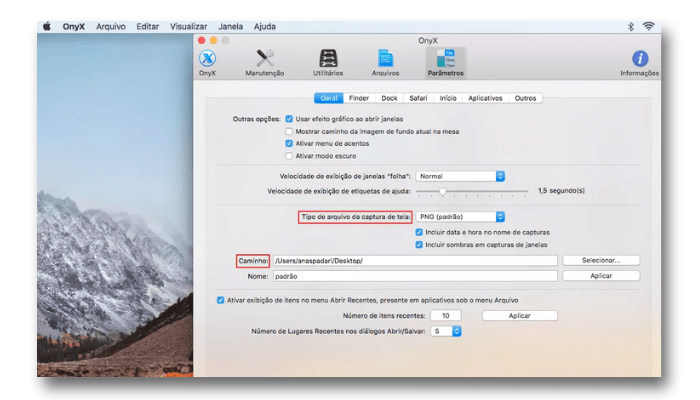
To change screen capture settings on Onyx for Mac, follow the step-by-step below:
- Open the application and tap on Parameters.
- Go to Screen capture file type to select the type or format you wish to save in.
- Go to Path and type where you’d like the screenshots to be saved on.

In the program it is possible to modify other presets such as including date and time information in the filenames of screenshots, or including a shadow in certain types of screen captures.
How to use Preview to save your screenshots in any format
Let’s say you don’t want to change the format of all screenshots permanently, but want to screenshot in different formats for a specific case. You can always use Preview.
Each file format serves a different purpose, so it can be very good in some cases but not so useful in others. Keep that in mind.
For example, TIFF files are of high quality, but they are too large, and PDF has a tough time being embedded in blog posts. PNG is very sharp, but depending on the resolution, its size can be very large, and in the case of JPEG or JPG you may have parts of the image blurry and therefore have lower image quality.
So, if a standard format doesn’t work for you, the following steps will help you change the file format to something else.
- Open the Preview on Mac in the Applications folder, or you can search for it on Spotlight.
- On the taskbar at the top, tap File > Capture Screen and then choose between Selection, Window or Full Screen, according to your necessities.
- The file you just captured will be opened automatically right after. Then, you can tap File > Export.
- On the box, click in Format and choose one of the desired formats, like HEIC , JPEG , JPEG-2000 , OpenEXR , PDF , PNG or TIFF.
- You can also name your file whatever you want and choose where you want to save it. Once you are done, click Save.
Once you have the basic idea, you can speed up the process by pressing Cmd + S in the preview window. Now choose the desired image file format for this screenshot and click Save .
Alternatively, you can click the Close button in the upper left corner of the preview window and you will automatically see the option to save the screenshot in the desired format.
Convert screenshots to different formats at a later date
Now that you know how to save all your Mac screenshots in different formats, you’ll have the flexibility to use them in your different jobs and projects as needed.
If you change your mind after taking a screenshot in a specific format, you can easily convert the images to other formats on your Mac instead of using third-party sites like convertio or having to retake the screenshot. But keep in mind that those remain an option!
How’d you like our guide on how to save screenshots in different formats?
Were you able to get anything out of it? Were we able to help you with your problem? Did we miss any other easy-to-execute methods? Comment down below, and let us know!


